How to Connect OAI eNB (USRP B210) with COTS UE
The instructions in this tutorial are valid only for newer release of openair-cn. Checkout latest develop branch for openair-cn to use this tutorial
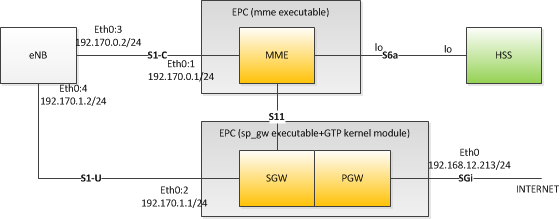
In this tutorial, we will introduce how to connect USRP-B210-based OAI eNB (and OAI EPC) with commercial off-the-shelf (COTS) UE such as smartphones and LTE dongles. We focus on installation and configuration with minimal modifications to sample config files and source codes from OAI. The goal is to help new starters set up the OAI environment as easily and quickly as possible.
The entire procedure is divided into three stages:
- Install and configure OAI eNB, EPC and HSS on a single or different hosts. At the end of this stage, EPC should be able to connect to HSS and eNB can connect to EPC + HSS.
- Configure UE (e.g., smartphone service mode, USIM card) and register the user on HSS database. At the end of this stage, UE should be able to attach and connect to eNB.
- Configure networking settings between eNB and UE. At the end of this stage, they should be able to ping each other and
iperfcan be run to test the throughput.
1. Installation and Configuration of OAI eNB + EPC + HSS
Checklist prior to OAI installation:
- Ubuntu 14.04 LTS (64-bit). We only test Ubuntu 14.04 extensively, so please do not try any other distribution for the first time.
- Kernel Setup Instructions, https://gitlab.eurecom.fr/oai/openairinterface5g/wikis/OpenAirKernelMainSetup
- disable C-states from BIOS (or from GRUB)
- disable CPU freq. scaling
- install low-latency kernel
- Install git with the command
sudo apt-get install git(we will be downloading source codes from the trunk at this moment).
Note: If GNURadio has already been installed, check the version of UHD. So the simplest way is to uninstall GNURadio and outdated UHD libraries. Please do not install UHD from sources as different versions can cause problems with the code. The recommended way to install UHD is through OAI scripts only ($OPENAIR_DIR/cmake_targets/build_oai -I -w USRP). We have tested versions 3.9.2/3.9.3/3.9.4/3.10.0 recently.
1.1 Installation
Do not run the scripts with sudo. Just run them as shown below and they will prompt you for password if necessary
Step 1: Check out the Trunk
First, we will download source codes from the link below as an example. See Get the Sources.
We assume that you have following directories:
- openair-cn : The location of openair-cn git repository
- openairinterface5g: The location of openairinterface5g repository.
Step 2: Specify FQDN for EPC
Second, a fully qualified domain name (FQDN) needs to be set for the EPC (MME_GW) 1[1], before we use
the automated script to build eNB, EPC and HSS all at once. An example is as follows. Assume the
hostname is "nano". You may check it in /etc/hostname.
nano@nano:$ cat /etc/hostname
nano
Then fill the FQDN in /etc/hosts as follows:
nano@nano:$ cat /etc/hosts
127.0.0.1    localhost
127.0.1.1    nano.openair4G.eur   nano
127.0.1.1    hss.openair4G.eur    hss

nano@nano:$ hostname
nano

nano@nano:$ hostname -f
nano.openair4G.eur
Do not proceed further if the output of hostname looks something else!!! You can use any other hostname other than nano but you must make sure realm/hostname are set correctly before you proceed further
"nano.openair4G.eur" is a sample FQDN, where "nano" is your hostname, and "openair4G.eur" is your realm. You can replace "openair4G.eur" with other combination.
If you change the hostname or /etc/hosts, you might need to reboot the computer for hostname settings to take effect!!!
Step 3: Run Automated Build Script (openairinterface5g)
Next, we will use the automated build script ~/trunk/cmake_targets/build_oai to build OAI eNB, EPC (i.e., MME_GW) and HSS on a single/local host.
cd ~/openairinterface
source oaienv
cd cmake_targets
./build_oai -I --eNB -x --install-system-files -w USRP       #for USRP
./build_oai -I  --eNB -x --install-system-files -w EXMIMO    #for EXMIMO
./build_oai -I  --eNB -x --install-system-files -w BLADERF   #for BladeRF
You can print out the help message to see what these options mean using the command "./build_oai -h". A short summary is as follows.
- -I: installs required packages.
- --eNB: installs eNB, i.e., lte-softmodem.
- -x: adds a software oscilloscope feature to the produced binaries.
- --install-system-files: installs OAI required files in Linux system.
- -w: adds the hardware support, which is USRP in our case.
During the building process, you will be asked to set the password for MySQL "root" user. You are recommended to use "linux", since this is the default password used by OAI; otherwise, you will have to edit some configuration file so that HSS is able to access MySQL database.
Notes:
- If you have previously build OAI on your host, please use -c or -C to remove existing compiled files.
- If you want to host eNB, EPC and HSS separately, the same process applies but configurations are different as will be mentioned later.
Look at AutoBuild for more details.
Step 4: Run Automated script for openair-cn
cd openair-cn
git checkout develop
git pull
cd SCRIPTS
./build_mme -i #(Need to run only once to install missing packages)
./build_hss -i #(Need to run only once to install missing packages)
./build_spgw -i #(Need to run only once to install missing packages)
The detailed instructions for EPC are located in: YOUR_openair-cn_DIRECTORY/DOCS/EPC_User_Guide.pdf
Look at AutoBuild for more details.
1.2 Configuration
1.2.1 eNB and EPC+HSS on Different Hosts (RECOMMENDED SETUP)
Next, we explain the setup for running eNB and EPC+HSS on two different hosts. Assume the IP addresses of eNB and EPC+HSS are 192.168.12.82 and 192.168.12.62 respectively. We also assume that the interface with which they are connected together is ethernet (eth0).
1.2.1.1 Configure eNB machine (update config files)
Note: You should always run eNB/EPC on seperate machines as there might be unexpected real-time issues
Then, make sure the networking parameters are properly specified in eNB and EPC configuration files. In eNB configuration file (~/openairinterface5g/targets/PROJECTS/GENERIC-LTE-EPC/CONF/enb.band7.tm1.usrpb210.conf),
tracking_area_code  =  "1";
mobile_country_code =  "208";
mobile_network_code =  "92";


////////// MME parameters:
    mme_ip_address      = ( { ipv4       = "192.168.12.62";
                              ipv6       = "192:168:30::17";
                              active     = "yes";
                              preference = "ipv4";
                            }
                          );
    NETWORK_INTERFACES :
    {
        ENB_INTERFACE_NAME_FOR_S1_MME         = "eth0";
        ENB_IPV4_ADDRESS_FOR_S1_MME           = "192.168.12.82/24";

        ENB_INTERFACE_NAME_FOR_S1U            = "eth0";
        ENB_IPV4_ADDRESS_FOR_S1U              = "192.168.12.82/24";
        ENB_PORT_FOR_S1U                      = 2152; # Spec 2152
    };
where mme_ip_address is network interface's IP address of your EPC/HSS, and NETWORK_INTERFACE is your eNB related network interface information.
1.2.1.2 Configure EPC machine (update config files)
Copy the EPC config files in /usr/local/etc/oai
sudo mkdir -p /usr/local/etc/oai/freeDiameter
sudo cp ~/openair-cn/ETC/mme.conf /usr/local/etc/oai
sudo cp ~/openair-cn/ETC/hss.conf /usr/local/etc/oai
sudo cp ~/openair-cn/ETC/spgw.conf /usr/local/etc/oai
sudo cp ~/openair-cn/ETC/acl.conf /usr/local/etc/oai/freeDiameter
sudo cp ~/openair-cn/ETC/mme_fd.conf /usr/local/etc/oai/freeDiameter
sudo cp ~/openair-cn/ETC/hss_fd.conf /usr/local/etc/oai/freeDiameter
In MME configuration file (/usr/local/etc/oai/mme.conf):
REALM = "openair4G.eur";

    S6A :
    {
        S6A_CONF                   = "/usr/local/etc/oai/freeDiameter/mme_fd.conf"; # YOUR MME freeDiameter config file path
        HSS_HOSTNAME               = "hss";                                         # THE HSS HOSTNAME
    };

GUMMEI_LIST = (
        {MCC="208" ; MNC="92"; MME_GID="4" ; MME_CODE="1"; }                   # YOUR GUMMEI CONFIG HERE
     );

TAI_LIST = (
{MCC="208" ; MNC="92";  TAC = "1"; }                              # YOUR PLMN CONFIG HERE
);

   NETWORK_INTERFACES :
    {
        # MME binded interface for S1-C or S1-MME  communication (S1AP), can be ethernet interface, virtual ethernet interface, we don't advise wireless interfaces
        MME_INTERFACE_NAME_FOR_S1_MME         = "eth0";                        # YOUR NETWORK CONFIG HERE
        MME_IPV4_ADDRESS_FOR_S1_MME           = "192.168.12.62/24";            # YOUR NETWORK CONFIG HERE

        # MME binded interface for S11 communication (GTPV2-C)
        MME_INTERFACE_NAME_FOR_S11_MME        = "lo";                          # YOUR NETWORK CONFIG HERE
        MME_IPV4_ADDRESS_FOR_S11_MME          = "127.0.11.1/8";                # YOUR NETWORK CONFIG HERE
        MME_PORT_FOR_S11_MME                  = 2123;                          # YOUR NETWORK CONFIG HERE
    };

S-GW :
{
    # S-GW binded interface for S11 communication (GTPV2-C), if none selected the ITTI message interface is used
    SGW_IPV4_ADDRESS_FOR_S11                = "127.0.11.2/8";            # YOUR NETWORK CONFIG HERE

};
In SPGW configuration file (/usr/local/etc/oai/spgw.conf):
S-GW :
{
    NETWORK_INTERFACES :
    {
        # S-GW binded interface for S11 communication (GTPV2-C), if none selected the ITTI message interface is used
        SGW_INTERFACE_NAME_FOR_S11              = "lo";                        # YOUR NETWORK CONFIG HERE
        SGW_IPV4_ADDRESS_FOR_S11                = "127.0.11.2/8";              # YOUR NETWORK CONFIG HERE

        # S-GW binded interface for S1-U communication (GTPV1-U) can be ethernet interface, virtual ethernet interface, we don't advise wireless interfaces
        SGW_INTERFACE_NAME_FOR_S1U_S12_S4_UP    = "eth0";                       # YOUR NETWORK CONFIG HERE, USE "lo" if S-GW run on eNB host
        SGW_IPV4_ADDRESS_FOR_S1U_S12_S4_UP      = "192.168.12.62/24";           # YOUR NETWORK CONFIG HERE
        SGW_IPV4_PORT_FOR_S1U_S12_S4_UP         = 2152;                         # PREFER NOT CHANGE UNLESS YOU KNOW WHAT YOU ARE DOING

        # S-GW binded interface for S5 or S8 communication, not implemented, so leave it to none
        SGW_INTERFACE_NAME_FOR_S5_S8_UP         = "none";                       # DO NOT CHANGE (NOT IMPLEMENTED YET)
        SGW_IPV4_ADDRESS_FOR_S5_S8_UP           = "0.0.0.0/24";                 # DO NOT CHANGE (NOT IMPLEMENTED YET)
    };
...
}


P-GW =
{
    NETWORK_INTERFACES :
    {
        # P-GW binded interface for S5 or S8 communication, not implemented, so leave it to none
        PGW_INTERFACE_NAME_FOR_S5_S8          = "none";                         # DO NOT CHANGE (NOT IMPLEMENTED YET)
        PGW_IPV4_ADDRESS_FOR_S5_S8            = "0.0.0.0/24";                   # DO NOT CHANGE (NOT IMPLEMENTED YET)

        # P-GW binded interface for SGI (egress/ingress internet traffic)
        PGW_INTERFACE_NAME_FOR_SGI            = "eth0";                         # YOUR NETWORK CONFIG HERE
        PGW_MASQUERADE_SGI                    = "yes";                          # YOUR NETWORK CONFIG HERE
       UE_TCP_MSS_CLAMPING                   = "no";                           # STRING, {"yes", "no"}.

    };
...
   # DNS address communicated to UEs
    DEFAULT_DNS_IPV4_ADDRESS     = "192.168.106.12";                            # YOUR NETWORK CONFIG HERE
    DEFAULT_DNS_SEC_IPV4_ADDRESS = "192.168.12.100";                            # YOUR NETWORK CONFIG HERE

...
}
In HSS freediameter configuration file (/usr/local/etc/oai/freeDiameter/hss_fd.conf):
Identity = "hss.openair4G.eur";
Realm = "openair4G.eur";
In MME freediameter configuration file (/usr/local/etc/oai/freeDiameter/mme_fd.conf):
Identity = "nano.openair4G.eur";
Realm = "openair4G.eur";
ConnectPeer= "hss.openair4G.eur" { ConnectTo = "127.0.0.1"; No_SCTP ; No_IPv6; Prefer_TCP; No_TLS; port = 3868;  realm = "openair4G.eur";};
In HSS configuration file (/usr/local/etc/oai/hss.conf):
MYSQL_user   = "root";
MYSQL_pass   = "linux"; #Put here the root password of mysql database that was provided during installation
OPERATOR_key = "1006020f0a478bf6b699f15c062e42b3"; # OP key for oai_db.sql, Must match to that of UE Sim card, OP_Key
Example configuration files for working setup
Note that PGW_IPV4_ADDRESS_FOR_SGI is the address used by EPC to access the (external) Internet.
1.2.2 eNB and EPC+HSS on Same Host (NOT RECOMMENDED SETUP)
Please **DO NOT** install EPC/eNB natively on the same machine due to conflicting packages/kernel and so on. IF you have at least 8 cores, 16 GB RAM, then you can try to EPC in VMWARE, while eNB is running natively on same machine. We have not tried this so this might have negative real-time performance, especially if you use USB based SDR like USRP B210
Next, we explain the setup for running eNB and EPC+HSS on same hosts. Assume the IP addresses of eNB/EPC are 192.168.12.82 respectively. We also assume that the interface with which they are connected together is ethernet (eth0).
The contents of /etc/hosts of this machine (calisson) that runs both eNB/EPC is:
calisson@calisson:$ cat /etc/hosts
127.0.0.1	localhost
127.0.1.1	calisson.openair4G.eur calisson
127.0.33.1      hss.openair4G.eur hss

calisson@calisson:$ hostname
calisson
If you change the hostname or /etc/hosts, you might need to reboot the computer for hostname settings to take effect!!!
The hostname of this machine is calisson
1.2.1.1 Configure eNB machine (update config files)
Then, make sure the networking parameters are properly specified in eNB and EPC configuration files. In eNB configuration file (~/openairinterface5g/targets/PROJECTS/GENERIC-LTE-EPC/CONF/enb.band7.tm1.usrpb210.conf),
tracking_area_code  =  "1";
mobile_country_code =  "208";
mobile_network_code =  "92";


////////// MME parameters:
    mme_ip_address      = ( { ipv4       = "127.0.1.10";
                              ipv6       = "192:168:30::17";
                              active     = "yes";
                              preference = "ipv4";
                            }
                          );
    NETWORK_INTERFACES :
    {
        ENB_INTERFACE_NAME_FOR_S1_MME         = "lo";
        ENB_IPV4_ADDRESS_FOR_S1_MME           = "127.0.1.2/8";

        ENB_INTERFACE_NAME_FOR_S1U            = "lo";
        ENB_IPV4_ADDRESS_FOR_S1U              = "127.0.6.2/8";
        ENB_PORT_FOR_S1U                      = 2152; # Spec 2152
    };
where mme_ip_address is network interface's IP address of your EPC/HSS, and NETWORK_INTERFACE is your eNB related network interface information.
1.2.2.2 Configure EPC machine (update config files)
Copy the EPC config files in /usr/local/etc/oai
sudo mkdir -p /usr/local/etc/oai/freeDiameter
sudo cp ~/openair-cn/ETC/mme.conf /usr/local/etc/oai
sudo cp ~/openair-cn/ETC/hss.conf /usr/local/etc/oai
sudo cp ~/openair-cn/ETC/spgw.conf /usr/local/etc/oai
sudo cp ~/openair-cn/ETC/acl.conf /usr/local/etc/oai/freeDiameter
sudo cp ~/openair-cn/ETC/mme_fd.conf /usr/local/etc/oai/freeDiameter
sudo cp ~/openair-cn/ETC/hss_fd.conf /usr/local/etc/oai/freeDiameter
In MME configuration file (/usr/local/etc/oai/mme.conf):
REALM = "openair4G.eur";

    S6A :
    {
        S6A_CONF                   = "/usr/local/etc/oai/freeDiameter/mme_fd.conf"; # YOUR MME freeDiameter config file path
        HSS_HOSTNAME               = "hss";                                         # THE HSS HOSTNAME
    };

GUMMEI_LIST = (
        {MCC="208" ; MNC="92"; MME_GID="4" ; MME_CODE="1"; }                   # YOUR GUMMEI CONFIG HERE
     );

TAI_LIST = (
{MCC="208" ; MNC="92";  TAC = "1"; }                              # YOUR PLMN CONFIG HERE
);

   NETWORK_INTERFACES :
    {
        # MME binded interface for S1-C or S1-MME  communication (S1AP), can be ethernet interface, virtual ethernet interface, we don't advise wireless interfaces
        MME_INTERFACE_NAME_FOR_S1_MME         = "lo";                        # YOUR NETWORK CONFIG HERE
        MME_IPV4_ADDRESS_FOR_S1_MME           = "127.0.1.10/8";            # YOUR NETWORK CONFIG HERE

        # MME binded interface for S11 communication (GTPV2-C)
        MME_INTERFACE_NAME_FOR_S11_MME        = "lo";                          # YOUR NETWORK CONFIG HERE
        MME_IPV4_ADDRESS_FOR_S11_MME          = "127.0.8.11/8";                # YOUR NETWORK CONFIG HERE
        MME_PORT_FOR_S11_MME                  = 2123;                          # YOUR NETWORK CONFIG HERE
    };

S-GW :
{
    # S-GW binded interface for S11 communication (GTPV2-C), if none selected the ITTI message interface is used
    SGW_IPV4_ADDRESS_FOR_S11                = "127.0.8.1/8";            # YOUR NETWORK CONFIG HERE

};
In SPGW configuration file (/usr/local/etc/oai/spgw.conf):
S-GW :
{

    NETWORK_INTERFACES :
    {
        # S-GW binded interface for S11 communication (GTPV2-C), if none selected the ITTI message interface is used
        SGW_INTERFACE_NAME_FOR_S11              = "lo";                    # YOUR NETWORK CONFIG HERE
        SGW_IPV4_ADDRESS_FOR_S11                = "127.0.8.1/8";            # YOUR NETWORK CONFIG HERE

        # S-GW binded interface for S1-U communication (GTPV1-U) can be ethernet interface, virtual ethernet interface, we don't advise wireless interfaces
        SGW_INTERFACE_NAME_FOR_S1U_S12_S4_UP    = "lo";                       # YOUR NETWORK CONFIG HERE, USE "lo" if S-GW run on eNB host
        SGW_IPV4_ADDRESS_FOR_S1U_S12_S4_UP      = "127.0.6.1/8";           # YOUR NETWORK CONFIG HERE
        SGW_IPV4_PORT_FOR_S1U_S12_S4_UP         = 2152;                         # PREFER NOT CHANGE UNLESS YOU KNOW WHAT YOU ARE DOING

        # S-GW binded interface for S5 or S8 communication, not implemented, so leave it to none
        SGW_INTERFACE_NAME_FOR_S5_S8_UP         = "none";                       # DO NOT CHANGE (NOT IMPLEMENTED YET)
        SGW_IPV4_ADDRESS_FOR_S5_S8_UP           = "0.0.0.0/24";                 # DO NOT CHANGE (NOT IMPLEMENTED YET)
    };

...
}


P-GW =
{
    NETWORK_INTERFACES :
    {
        # P-GW binded interface for S5 or S8 communication, not implemented, so leave it to none
        PGW_INTERFACE_NAME_FOR_S5_S8          = "none";                         # DO NOT CHANGE (NOT IMPLEMENTED YET)
        PGW_IPV4_ADDRESS_FOR_S5_S8            = "0.0.0.0/24";                   # DO NOT CHANGE (NOT IMPLEMENTED YET)

        # P-GW binded interface for SGI (egress/ingress internet traffic)
        PGW_INTERFACE_NAME_FOR_SGI            = "eth0";                         # YOUR NETWORK CONFIG HERE
        PGW_IPV4_ADDRESS_FOR_SGI              = "192.168.12.82/24";             # YOUR NETWORK CONFIG HERE
        PGW_MASQUERADE_SGI                    = "yes";                          # YOUR NETWORK CONFIG HERE
    };
...
   # DNS address communicated to UEs
    DEFAULT_DNS_IPV4_ADDRESS     = "192.168.106.12";                            # YOUR NETWORK CONFIG HERE
    DEFAULT_DNS_SEC_IPV4_ADDRESS = "192.168.12.100";                            # YOUR NETWORK CONFIG HERE

...
}
In HSS freediameter configuration file (/usr/local/etc/oai/freeDiameter/hss_fd.conf):
Identity = "hss.openair4G.eur";
Realm = "openair4G.eur";
In MME freediameter configuration file (/usr/local/etc/oai/freeDiameter/mme_fd.conf):
Identity = "calisson.openair4G.eur";
Realm = "openair4G.eur";
ConnectPeer= "hss.openair4G.eur" { ConnectTo = "127.0.33.1"; No_SCTP ; No_IPv6; Prefer_TCP; No_TLS; port = 3868;  realm = "openair4G.eur";};
In HSS configuration file (/usr/local/etc/oai/hss.conf):
MYSQL_user   = "root";
MYSQL_pass   = "linux"; #Put here the root password of mysql database that was provided during installation
OPERATOR_key = "1006020f0a478bf6b699f15c062e42b3"; # OP key for oai_db.sql, Must match to that of UE Sim card, OP_Key
Example configuration files for working setup
Note that PGW_IPV4_ADDRESS_FOR_SGI is the address used by EPC to access the (external) Internet.
1.3.1 Running eNB, EPC and HSS (Assuming eNB, EPC, HSS are on different machines)
Install certificates:
cd ~/openair-cn/SCRIPTS
./check_hss_s6a_certificate /usr/local/etc/oai/freeDiameter/ hss.openair4G.eur
./check_mme_s6a_certificate /usr/local/etc/oai/freeDiameter/ nano.openair4G.eur
Compile & Run HSS (ALWAYS RUN HSS FIRST):
cd ~/openair-cn
cd SCRIPTS
./build_hss -c
./run_hss -i ~/openair-cn/SRC/OAI_HSS/db/oai_db.sql #Run only once to install database
./run_hss  #Run this for all subsequent runs
Compile & Run MME:
cd ~/openair-cn/SCRIPTS
./build_mme -c
./run_mme
Compile & Run SP-GW:
cd ~/openair-cn
cd SCRIPTS
./build_spgw -c
./run_spgw
After EPC is connected to HSS (you should see both enter STATE_OPEN from the terminal), compile and start eNB with the following commands below:
Compile & Run eNB:
cd ~/openairinterface5g
source oaienv
./cmake_targets/build_oai -w USRP -x -c --eNB
cd cmake_targets/lte_build_oai/build
sudo -E ./lte-softmodem -O $OPENAIR_DIR/targets/PROJECTS/GENERIC-LTE-EPC/CONF/enb.band7.tm1.usrpb210.conf -d
sudo -E ./lte-softmodem -h #(to see help options)
You may print out the help message to see other options. A summary of the above options is given below.
- -O: configuration file
- -m: set the maximum downluink MCS
- -t: set the maximum uplink MCS
- -x: set the transmission mode, valid option: 1
- -W: enable L2 Wireshark messages on localhost
Note: some other options are very useful for debugging purposes, such as -V, which enables VCD and generates a log file (/tnp/openair_dump_eNB.vcd) with a lot of details, and -d, which enables software oscilloscope with interactive graphic interfaces. Since both consume a lot of computing resources (one is heavy on file access, the other one is heavy on graphics), you are recommended to disable them for normal use.
Do not change tx_gain/rx_gain parameters in config file, unless you know what you are doing. These parameters are calibrated w.r.t UHD version and also w.r.t band you are using
When eNB is successfully connected, you should see something like the following on eNB terminal:
[SCHED][eNB] Started eNB main thread on CPU 1 TID 5273
eNB_thread: mlockall in ...
eNB_thread: mlockall out ...
waiting for sync (eNB_thread)
TYPE <CTRL-C> TO TERMINATE
Entering ITTI signals handler
1.3.2 Running eNB, EPC and HSS (Assuming eNB, {EPC, HSS} are on same machines. We assume in our case that this machine is calisson as described above)
Install certificates:
cd ~/openair-cn/SCRIPTS
./check_hss_s6a_certificate /usr/local/etc/oai/freeDiameter/ hss.openair4G.eur
./check_mme_s6a_certificate /usr/local/etc/oai/freeDiameter/ calisson.openair4G.eur
Compile & Run HSS (ALWAYS RUN HSS FIRST):
cd ~/openair-cn
cd SCRIPTS
./build_hss -c
./run_hss -i ~/openair-cn/SRC/OAI_HSS/db/oai_db.sql #Run only once to install database
./run_hss #Run for all subsequent runs
Compile & Run MME:
cd ~/openair-cn/SCRIPTS
./build_mme -c
./run_mme
Compile & Run SP-GW:
cd ~/openair-cn
cd SCRIPTS
./build_spgw -c
./run_spgw
After EPC is connected to HSS (you should see both enter STATE_OPEN from the terminal), compile and start eNB with the following commands below:
Compile & Run eNB:
cd ~/openairinterface5g
source oaienv
./cmake_targets/build_oai -w USRP -x -c --eNB
cd cmake_targets/lte_build_oai/build
sudo -E ./lte-softmodem -O $OPENAIR_DIR/targets/PROJECTS/GENERIC-LTE-EPC/CONF/enb.band7.tm1.usrpb210.conf -d
sudo -E ./lte-softmodem -h #(to see help options)
1.4 Possible Issues
Issue 1: MME Fails to Connect to HSS (1)
This is often due to errors/mismatch between hostname/REALM settings in /etc/hosts, /etc/hostname and MME/HSS config files. Please make sure that certificates are installed with with correct FQDN for both MME/HSS
Issue 2: MME Fails to Connect to HSS (2)
Another possible cause is that mobile country code (MCC), mobile network code (MNC) and tracking area code (TAC) are not matched in configuration files for eNB and EPC. You need to make sure they match if you want to use your own.
2. UE Configuration and User Registration on HSS Database
Now eNB, EPC and HSS are working properly, and we may move to the next stage. Assume that the UE or USIM card has the following information (Link):
- MCC (Mobile Country Code): 208
- MNC (Mobile Network Code): 93
- TAC (Tracking Area Code): 123
- IMSI: 208930000000001
- Ki: 8BAF473F2F8FD09487CCCBD7097C6862 (32 digits)
- OP (Operator Key): 11111111111111111111111111111111 (32 digits). In hss.conf file, OPERATOR_key = "1006020f0a478bf6b699f15c062e42b3", OP key, Must be consistent with SIM card’s OP value
You may other combinations as you like.
2.1 USIM Card Programming
Go to https://gitlab.eurecom.fr/oai/openairinterface5g/wikis/SimCardConfig to see several ways to programm the SIM card. We will programm USIM cards with Milenage support using open-cells.com reader/writer, however you are free to use the one you consider the best.
Writing usim
First time you need to compile the Open Cells program. You can download it from https://open-cells.com/d5138782a8739209ec5760865b1e53b0/uicc-v1.6.tgz.
make
Then, you need to insert the USIM into the reader/writer as shown in the next Figure.

Use this line to program your SIM card.
sudo ./program_uicc --adm 12345678 --opc e734f8734007d6c5ce7a0508809e7e9c --key 8baf473f2f8fd09487cccbd7097c6862 --spn openairinterface --authenticate
Some program_uicc options are:
- --adm: The ADM code of the card (the master password)
- --opc: OPc field: OPerator code: must be also set in HSS (exlusive with OP)
- --key: The authentication key (called Ki in 3G/4G, Kc in GSM), must be the same in HSS
- --spn: Service provider name: the name that the UE will show as 'network'
- --authenticate: Test the milenage authentication and discover the current sequence number
Your output is:
Setting new values
Read new values in UICC
ICCID: 89860061100000000002
WARNING: iccid luhn encoding of last digit not done
USIM IMSI: 208930100001102
USIM MSISDN: 00000002
USIM Service Provider Name: openairinterface
Succeeded to authentify with SQN: 96
set HSS SQN value as: 128
Finally, do not forget to change the SQN number into the oai_db.
2.2 UE Configuration
TBD (pics + description)
2.2.1 Smartphone: Samsung S3
2.2.2 Smartphone: Samsung S4 mini
You have to create a new APN profile in your smartphone according the one that you will assign to the UE in the HSS database. So you have to go Settings->Mobile network settings->Access Point Names-> Add a new apn.
Give a name to this apn profile (e.g. eur). At the APN field write
the name that exists on the HSS database (e.g. oai.ipv4). At the Bearer field check the option LTE.
Save the apn profile and then select it.
2.2.3 LTE Dongle: Bandrich LTE Dongle C501
2.2.4 LTE Dongle: Huawei E3372
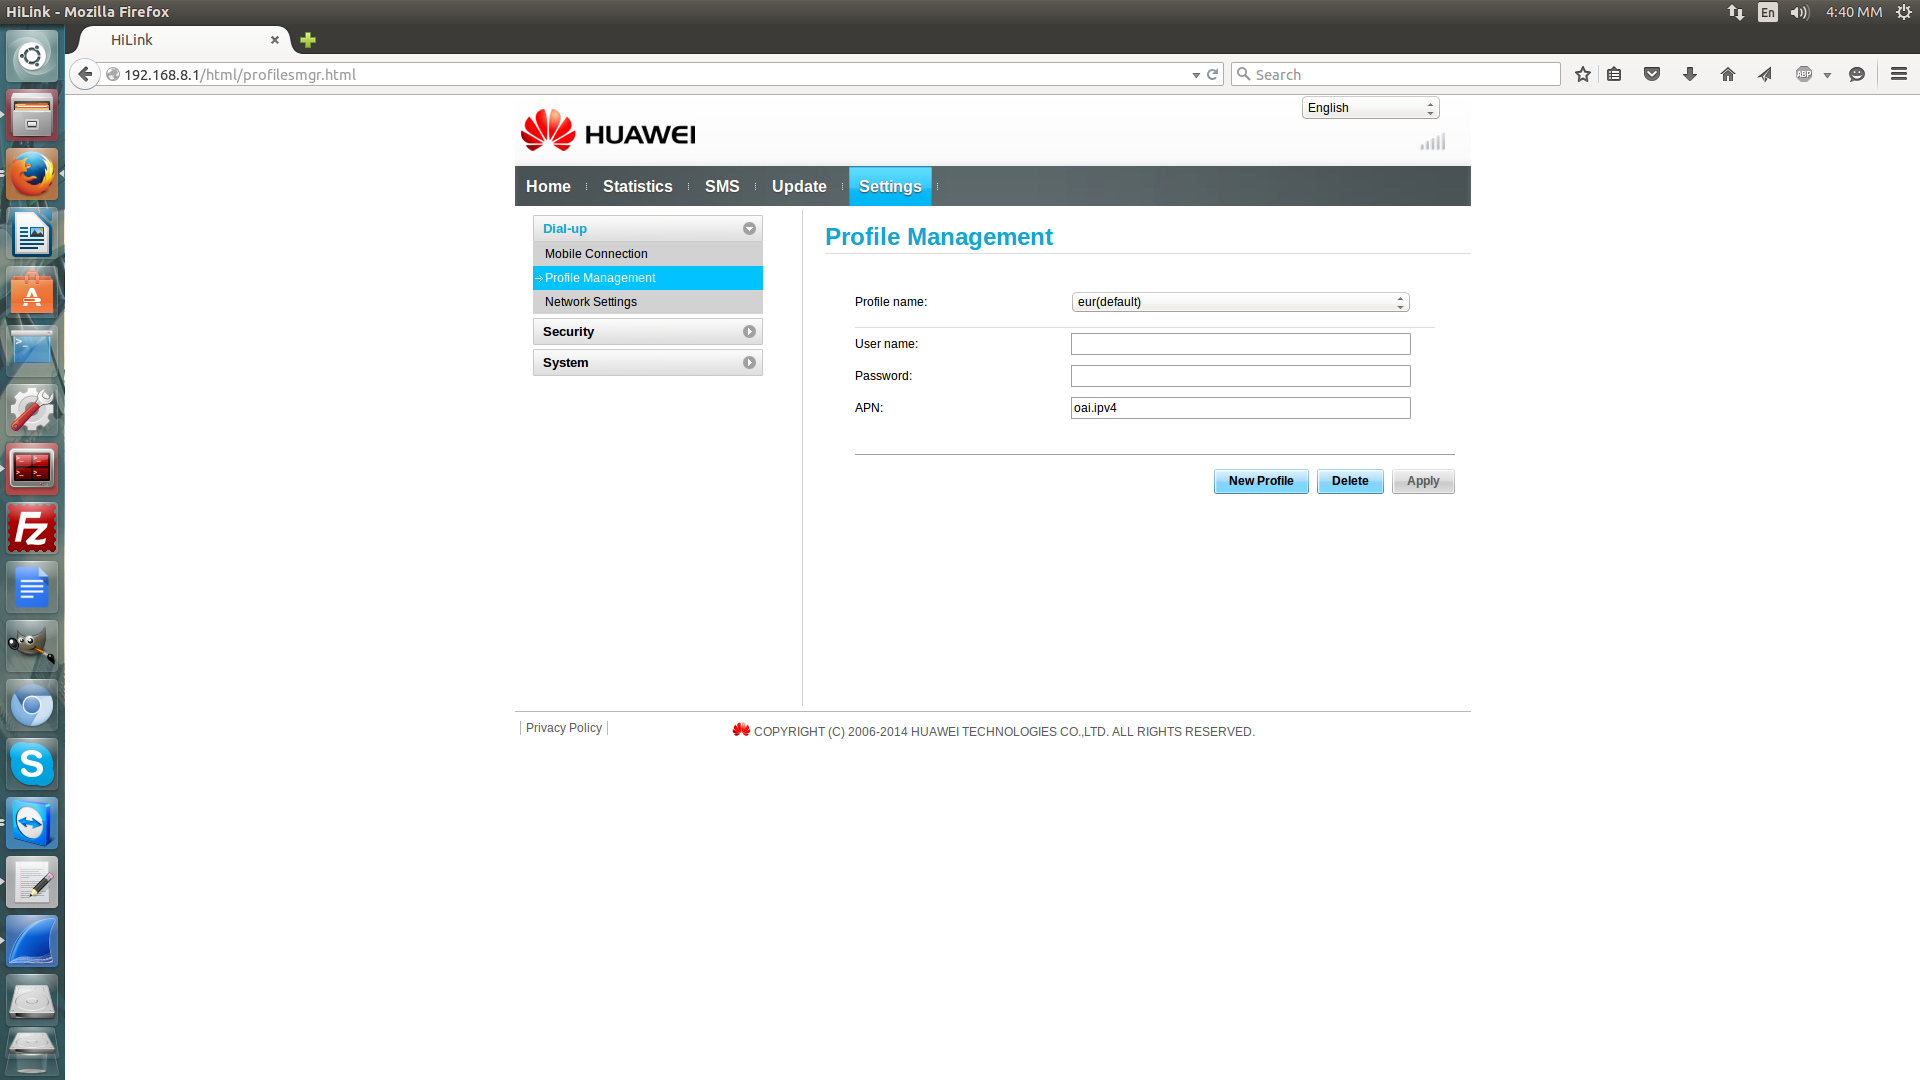
For this LTE Dongle you don't have to give at commands in order to configure it but you can do it from the graphical interface that it is on the url 192.168.8.1. You have to go to Profile Management and add a new APN profile (see the picture below)
2.3 User Registration on HSS Database
In order for UE to complete the attach procedure successfully, we need to register the user on HSS database.
Step 1: Install Phpmyadmin (Optional)
The EPC scripts install phpmyadmin by default. If your phpmyadmin installation does not work, only then use the instructions below
In this case, phpmyadmin may come handy to you. Alternatively, you may access MySQL database from the command line. The instructions are available here. In most cases, the following commands will work for you.
sudo apt-get install phpmyadmin
sudo ln -s /etc/phpmyadmin/apache.conf /etc/apache2/conf-available/phpmyadmin.conf
sudo a2enconf phpmyadmin
sudo /etc/init.d/apache2 reload
Then you can access the HSS database via http://127.0.0.1/phpmyadmin/ with username "root" and password "linux".
Step 2: Add User to Table oai_db.users
You may check out existing users in the database via phpmyadmin. However, you may not be able to insert a user record on phpmyadmin, because the Key (as well as OPc) is stored as binary in the database. Use the following commands as a guide.
shell > mysql -u root -p
# The password is "linux"
mysql > use oai_db;
# show all tables
mysql > show tables;
# show all entries in mmeidentity
mysql > select * from mmeidentity;
mysql > INSERT INTO users (`imsi`, `msisdn`, `imei`, `imei_sv`, `ms_ps_status`, `rau_tau_timer`, `ue_ambr_ul`, `ue_ambr_dl`, `access_restriction`, `mme_cap`, `mmeidentity_idmmeidentity`, `key`, `RFSP-Index`, `urrp_mme`, `sqn`, `rand`, `OPc`) VALUES ('208930000000001',  '33638060010', NULL, NULL, 'PURGED', '120', '50000000', '100000000', '47', '0000000000', '3', 0x8BAF473F2F8FD09487CCCBD7097C6862, '1', '0', '', 0x00000000000000000000000000000000, '');
There are a couple of things to note:
- msisdn: even though it is optional, you may not leave it blank since OAI will check its presence (any value would be fine).
- OPc: OPc is computed from OP and Key. You may leave it NULL, since HSS will compute it for you; or you may use the online tools listed here to compute the value.
Hostname of EPC/MME: IF you use a different hostname than what is mentioned in wiki, then you need to change it in HSS database as well.
Step 3: Update Tables oai_db.mmeidentity and oai_db.pdn
shell > mysql -u root -p
# The password is "linux"
mysql > use oai_db;

mysql > INSERT INTO pdn (`id`, `apn`, `pdn_type`, `pdn_ipv4`, `pdn_ipv6`, `aggregate_ambr_ul`, `aggregate_ambr_dl`, `pgw_id`, `users_imsi`, `qci`, `priority_level`,`pre_emp_cap`,`pre_emp_vul`, `LIPA-Permissions`) VALUES ('60',  'oai.ipv4','IPV4', '0.0.0.0', '0:0:0:0:0:0:0:0', '50000000', '100000000', '3',  '208930000000001', '9', '15', 'DISABLED', 'ENABLED', 'LIPA-ONLY');

mysql > INSERT INTO mmeidentity (`idmmeidentity`,`mmehost`,`mmerealm`,`UE-reachability`) VALUES ('6','nano.openair4G.eur','openair4G.eur','0');

mysql > INSERT INTO mmeidentity (`idmmeidentity`,`mmehost`,`mmerealm`,`UE-reachability`) VALUES ('7','calisson.openair4G.eur','openair4G.eur','0');
2.4 Connect UE to eNB
2.5 Possible Issues
Issue 1: MNC Not Found (mcc_mnc_list)
If you choose a good combination of MCC and MNC that is not currently in the mcc_mnc_list, you may see some error like the following on the EPC terminal:
...
Assertion (0) failed!
In mme_app_handle_nas_auth_param_req() /home/labuser/trunk/openair-cn/MME_APP/mme_app_authentication.c:291
MNC Not found (mcc_mnc_list)
...
So the solution is to add your own combination to the mcc_mnc_list located in ~/trunk/openair-cn/UTILS/mcc_mnc_itu.c.
Then you can rebuild EPC with the following command.
~/openair-cn/SCRIPTS/build_epc #(Run this command with options as discussed in sections above)
Issue 2: iptables: No chain/target/match by that name.
...
iptables: No chain/target/match by that name.
[SPGW-APP][E]ERROR in system command iptables -t mangle -A FORWARD -d 192.168.3.2 -m mark --mark 0
-j GTPUSP --own-ip 127.0.0.1 --own-tun 1 --peer-ip 127.0.0.1 --peer-tun 3396329693 --action add: 256
at /home/labuser/trunk/openair-cn/SGW-LITE/sgw_lite_handlers.c:897
If you see an error like this, insert ~/trunk/targets/bin/xt_GTPUSP.ko:
sudo insmod ~/trunk/targets/bin/xt_GTPUSP.ko
Issue 3: UE Connects but cannot access Internet.
-
TESTED: See last section of EPC USER Guide [1] on how to connect eNB and EPC machine without using switch in between and changing interface MTU. You can also try to build a VPN between EPC and eNB machine and set the MTU of VPN interface to say 1600. We have not tried but here is example tutorial, http://blog.boyeau.com/cheat-sheet-establishing-a-vpn-tunnel-between-2-linux-servers/. Please let us know if this works for you on the mailing list with detailed instructions on how you did it. It will help the community
-
TESTED: Root the phone and manually change the MTU on the phone to 1400 using ifconfig or any other utility once the phone is connected. This will work on Android phones.
-
NOT TESTED: You can simply change the MTU of both EPC and eNB machines to 1600 and connect them directly. If they are connected together via switch/router, then you need to inspect switch configuration that it does not assemble/dis-assemble packets. We simply recommend to connect them directly to avoid issues with switch configuration which is not easy to document and can result in unpredicable behavior in the network if done incorrectly. If you make this work, please create a tutorial with detailed instructions to help the community to help our open source project -
NOT TESTED: Install EPC in a KVM or VMWARE on the same machine running eNB (natively). So, this machine has to be at least 8 cores w/ 16 GB RAM. Then change the MTU of bridge and all its associated interfaces to 1600 and use this interface for S1 link between eNB/EPC. There is VMWARE image you can readily use for this. Checkout the VMWARE image from here, https://gitlab.eurecom.fr/oai/openairinterface5g/wikis/HowToConnectCOTSUEwithOAIeNBNew#example-vmware-image-with-working-core-network-installation-for-47x-linux-kernel. This might create real-time issues esp. with USB based SDRs like, USRP B210, so we have to see how well this works. Community testing will help out with this as every configuration is slightly different. Please DO NOT install EPC/eNB natively on the same machine due to conflicting packages/kernel and so on. If you make this work, please create a tutorial with detailed instructions to help the community to help our open source project
Issue 4: You cannot connect to mysql server
/etc/init.d/mysql restart
Issue 5: USRP exits saying it received/transmitted x samples out of xxxxx
-
There could be a real time issue, please see here, and follow everything carefully, https://gitlab.eurecom.fr/oai/openairinterface5g/wikis/OpenAirKernelMainSetup#ubuntu-14043-ltslinux-kernel-version-319-recommended
-
If the issue persists, and the USRP or any other SDR is connected via USB, then disconnect all the USB devices from the eNB and work on it from remote session. The other USB devices can create negative impact on performance. Or you can buy USRP x310 and connect it via PCIe interface which is more reliable. http://www.ettus.com/product/details/X310-KIT
References:
[1] https://gitlab.eurecom.fr/oai/openair-cn/blob/develop/DOCS/EPC_User_Guide.pdf [1]: https://gitlab.eurecom.fr/oai/openair-cn/blob/develop/DOCS/EPC_User_Guide.pdf
Example VMWare image with working core network installation (for 4.7.x linux kernel)
- Download the README, ftp://ftp.eurecom.fr/incoming/vmware-image-oai-new/README
- Download the VMWare Image, ftp://ftp.eurecom.fr/incoming/vmware-image-oai-new/vmware-image-4.7.1.tar.gz
You can install VMWare Workstation (https://www.vmware.com/products/workstation) and use this image. Please note that you might have to change the config files to reflect your VMWare Ethernet networking configuration. After downloading the above image, you need to unzip the image. It might take sometime due to big image.
Login:osboxes
Password:linux
Attachments
- enb.band7.tm1.usrpb210.conf (Example config file when eNB/EPC are on same machine. Use the latest file ($OPENAIR_DIR/targets/PROJECTS/GENERIC-LTE-EPC/CONF/enb.band7.tm1.usrpb210.conf) and modify the networking configuration only without touching RF related parameters
- eNB_EPC_different_hosts.png
- eNB_EPCHSS_local_host.png
- epc_commented.png
- epc.png
- figure_local_eNB_EPC.png
- huawei_apn.png