[under construction]
OAI remote access testbed
1. OAI testbed
1.1 OAI testbed equipment
Towards the development of a remote accessible LTE testbed in order to give access to experimenters from all over the world to OAI software/hardware platform, EURECOM has proceeded to the deployment of an OAI testbed.
Currently, the deployed OAI testbed consists of 3 OAI soft eNBs (2 support the EXMIMO II card and 1 support USRP B210 UHD interface) and 1 OAI EPC + HSS running on the top of Ubuntu 14.04 Intel-based PCs (2 Intel Core i7@3.2 GHz and 2 Intel Core i5@3.2 GHz) as depicted in Figure 1. COTS UE is also supported by a laptop equipped with a USB LTE dongle (Bandrich C500).
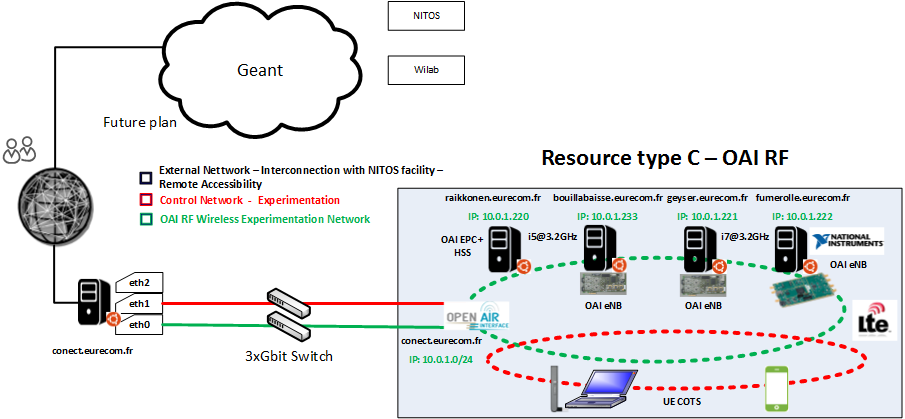
The possible OAI testbed connections are described as follows:
- OAI SW + OAI HW: EXMIMO II card or USRP B210
- OAI EPC + OAI eNB <--> COTS UE
- OAI eNB <--> COTS UE
Figure 1.: OAI remote access testbed
1.2 OAI testbed remote access via SSH
Each user that intends to access remotely the OAI testbed will be assigned a unique username and password upon request. For acquiring credentials, please contact us via e-mail at: @eurecom.fr.
To access the OAI testbed portal via ssh, please type the following command:
ssh myuser@conect.eurecom.fr
After having access to the portal, you can setup your testbed. The OAI eNBs can be accessed as follows:
ssh myuser@geyser.eurecom.fr                  #eNB (EXMIMO support)
ssh myuser@fumerolle.eurecom.fr               #eNB (EXMIMO support)
ssh myuser@bouillabaisse.eurecom.fr           #eNB (USRP support)
To access the OAI EPC + HSS, please type the following:
ssh myuser@raikkonen.eurecom.fr #EPC + HSS
To access the COTS UE (USB LTE dongle), please type the following:
ssh myuser@foo.eurecom.fr #COTS UE
2. Installation and Configuration of OAI EPC + HSS
2.1 Installation
Step 1: Check out the Trunk
Download the source code from the appropriate Git repository (see Get the Sources). We assume that you have following directory:
openair-cn : The location of openair-cn git repository
Step 2: Specify FQDN for EPC
Please refer to Step 2 of Section 1.1. in HowtoconnectCOTSUEtoOAIeNB.
Step 3: Run automated scripts for openair-cn
Please refer to Step 4 of Section 1.1. in HowtoconnectCOTSUEtoOAIeNB.
2.2 Configuration and execution
Step 1: Edit the EPC configuration file: ~/openair-cn/BUILD/EPC/epc.conf.in
As depicted in Figure 2 the IP address of EPC+HSS is 192.168.12.4 and the Ethernet interface name is eth0. Also we assume that the UE that will be used will be configured with the following information (SIMInfo):
- MCC (Mobile Country Code):
208 - MNC (Mobile Network Code):
93 - TAC (Tracking Area Code):
123 - IMSI: 208930000000001
- Ki: 8BAF473F2F8FD09487CCCBD7097C6862 (32 digits)
- OP (Operator Key): 11111111111111111111111111111111 (32 digits)
Using this information the configuration file of EPC is edited as follows:
TAI_LIST = (
{MCC="208" ; MNC="93";  TAC = "1"; }                              # YOUR PLMN CONFIG HERE
);


NETWORK_INTERFACES :
    {
        MME_INTERFACE_NAME_FOR_S1_MME         = "eth0";
        MME_IPV4_ADDRESS_FOR_S1_MME           = "192.168.12.4/24";

        MME_INTERFACE_NAME_FOR_S11_MME        = "none";
        MME_IPV4_ADDRESS_FOR_S11_MME          = "0.0.0.0/24";
    };
S-GW :
{
    NETWORK_INTERFACES :
    {
        SGW_INTERFACE_NAME_FOR_S11            = "none";
        SGW_IPV4_ADDRESS_FOR_S11              = "0.0.0.0/24";

        SGW_INTERFACE_NAME_FOR_S1U_S12_S4_UP  = "eth0";
        SGW_IPV4_ADDRESS_FOR_S1U_S12_S4_UP    = "192.168.12.4/24";
        SGW_IPV4_PORT_FOR_S1U_S12_S4_UP       = 2152;

        SGW_INTERFACE_NAME_FOR_S5_S8_UP       = "none";
        SGW_IPV4_ADDRESS_FOR_S5_S8_UP         = "0.0.0.0/24";
    };
};
P-GW :
{
    NETWORK_INTERFACES :
    {
        PGW_INTERFACE_NAME_FOR_S5_S8          = "none";
        PGW_IPV4_ADDRESS_FOR_S5_S8            = "0.0.0.0/24";

        PGW_INTERFACE_NAME_FOR_SGI            = "eth0";
        PGW_IPV4_ADDRESS_FOR_SGI              = "192.168.12.4/24";
        PGW_MASQUERADE_SGI                    = "yes";
     };
     ...
}
Note that PGW_IPV4_ADDRESS_FOR_SGI is the address used by EPC to access the (external) Internet.
Step 2: Run EPC and HSS
Please refer to Section 1.3.2 in HowToConnectCOTSUEwithOAIeNB
3. Installation and Configuration of OAI eNB
3.1 Installation
Step 1: Check out the Trunk
Download the source code from the appropriate Git repository (see Get the Sources). We assume that you have following directory:
openairinterface5g: The location of openairinterface5g repository.
Step 2: Run automated build script (openairinterface5g)
Please refer to Step 3 of Section 1.1 in HowToConnectCOTSUEwithOAIeNB.
3.2 Configuration and execution
Step 1: Edit the eNB configuration file (~/openairinterface5g/targets/PROJECTS/GENERIC-LTE-EPC/CONF/enb.band7.tm1.rrh.usrpb210.conf)
The file is edited appropriately with respect to Figure 2:
- IP address of EPC/HSS is
192.168.12.4 - IP address of eNB towards EPC/HSS is
192.168.12.3and Ethernet interface name iseth1
It is assumed that UDP ETHERNET communication will be used and finally, we again assume that the UE that will be used will be configured with the information mentioned in Step 1: Edit the EPC configuration file. Using this information the configuration file of eNB is edited as follows:
tracking_area_code  =  "1";
mobile_country_code =  "208";
mobile_network_code =  "93";


////////// MME parameters:
    mme_ip_address      = ( { ipv4       = "192.168.12.4";
                              ipv6       = "192:168:3::17";
                              active     = "yes";
                              preference = "ipv4";
                            }
                          );

    NETWORK_INTERFACES :
    {
        ENB_INTERFACE_NAME_FOR_S1_MME            = "eth1";
        ENB_IPV4_ADDRESS_FOR_S1_MME              = "192.168.12.3/24";

        ENB_INTERFACE_NAME_FOR_S1U               = "eth1";
        ENB_IPV4_ADDRESS_FOR_S1U                 = "192.168.12.3/24";
        ENB_PORT_FOR_S1U                         = 2152; # Spec 2152
    };
Step 2: Run eNB
For USRP, refer to Section 1.3.2 in HowToConnectCOTSUEwithOAIeNB.
For ExpressMimo2, refer to OpenAirExpressMimo2.
3. UE Configuration
To attach/detach remotely the UE from the network you have to run the following python scripts that located at ~/openairinterface5g/cmake_targets/autotests/tools as it follows:
sudo -E configure_cots_bandrich_ue.py --start-ue   #To start UE
sudo -E configure_cots_bandrich_ue.py --stop-ue    #To stop UE
sudo -E configure_cots_bandrich_ue.py --reset-ue   #To reset UE
In all cases, each time the UE is stopped/reset, first you start the EPC, then the ENB and finally the UE.
4. User Registration on HSS Database
At this point we have an operating base station and core network, so it is time to configure the COTS UE and use it, see Section 2.3 in HowToConnectCOTSUEwithOAIeNB.
References:
[1] https://gitlab.eurecom.fr/oai/openair-cn/blob/master/DOCS/EPC_User_Guide.pdf [1]: https://gitlab.eurecom.fr/oai/openair-cn/blob/master/DOCS/EPC_User_Guide.pdf [2] https://gitlab.eurecom.fr/oai/openairinterface5g/blob/master/targets/DOCS/E-UTRAN_User_Guide.pdf [2]: https://gitlab.eurecom.fr/oai/openairinterface5g/blob/master/targets/DOCS/E-UTRAN_User_Guide.pdf