How to Connect OAI EPC/HSS, OAI eNB (USRP B210) with OAI UE (USRP B210) using S1 interface
This tutorial is intended to setup the OAI EPC/HSS, OAI eNB and OAI UE using the S1 interface and allowed the UE to connect to eNB and surfing Internet. You need 2 Ubuntu machines (EPC/HSS and eNB running in same host) or 3 Ubuntu machines (EPC/HSS and eNB running in separate host) .
The procedures includes the following:
- Build the UE with NAS support in 1st Ubuntu machine.
- Build the eNB with S1 interface in 2nd Ubuntu machine.
- Build the EPC/HSS with S1 interface in 3rd Ubuntu machine
- Run the EPC/HSS.
- Run the eNB.
- Run the UE. Bring up the OIP Interface (ue_ip) in UE.
- Once UE attched to eNB, do some throughput test or ping.
1. Installing, Building and Running the OAI EPC/HSS, OAI eNB and the OAI UE with S1 Interface
Checklist prior to OAI installation:
-
Ubuntu 14.04 LTS (32-bit or 64-bit)
-
- Disable C-states from BIOS (or from GRUB)
- Disable CPU freq. scaling
- Install low-latency kernel
-
Install subversion with the command:
sudo apt-get install subversionfor SVN version
-
Install git with the command:
sudo apt-get install gitfor GIT version.
-
Install UHD driver for USRP Hardware B210 using the following commands:
sudo bash -c 'echo "deb http://files.ettus.com/binaries/uhd/repo/uhd/ubuntu/`lsb_release -cs` `lsb_release -cs` main" > /etc/apt/sources.list.d/ettus.list'
sudo apt-get install -t `lsb_release -cs` uhd
sudo apt-get update
Note: UHD related information can be found at: http://files.ettus.com/manual/page_install.html#install_linux
1.1 Installating UE with NAS Support (S1) on 1st Ubuntu Machine
Step 1: Check out the GIT trunk version of OAI
Download the source codes using git (tested version r7772):
mkdir -p ~/openairinterface5g
git clone https://gitlab.eurecom.fr/oai/openairinterface5g.git
git clone https://gitlab.eurecom.fr/oai/openair-cn.git
Make sure that the openair-cn inside the openairinterface5g folder
Refer to Get the Sources for more details on downloading the code.
Step 2: Run Automated Build Script for UE with S1 Interface
Build the UE supporting B210:
If you want to do data transfer you need to enable Linux and Netlink. For this you need to change the following two line CMakeLists.txt :
add_boolean_option(LINUX False "used in weird memcpy() in pdcp.c ???")
to :
add_boolean_option(LINUX True "used in weird memcpy() in pdcp.c ???").
and
add_boolean_option(PDCP_USE_NETLINK False "For eNB, PDCP communicate with a NETLINK socket if connected to network driver, else could use a RT-FIFO")
to :
add_boolean_option(PDCP_USE_NETLINK True "For eNB, PDCP communicate with a NETLINK socket if connected to network driver, else could use a RT-FIFO")
cd ~/openairinterface5g/cmake_targets
./build_oai -w USRP --UE
This should starts the building process in ~/openairinterface5g/cmake_targets/lte_build_oai.
1.2 Installing eNB on 2nd Ubuntu Machine
Step 1: Check out the GIT trunk version of OAI
Download the source codes using git:
mkdir -p ~/openairinterface5g
git clone https://gitlab.eurecom.fr/oai/openairinterface5g.git
git clone https://gitlab.eurecom.fr/oai/openair-cn.git
Make sure that the openair-cn inside the openairinterface5g folder
Refer to Get the Sources for more details.
Step 2: Run Automated Build Script for eNB with S1 Interface
Build the eNB supporting B210:
cd ~/openairinterface5g/cmake_targets
./build_oai -w USRP --eNB
This should starts the building process in ~/openairinterface5g/cmake_targets/lte_build_oai.
Please note that svn version is deprecated. You can use the git version found at Get the Sources and build found at AutoBuild.
1.3 Installing EPC/HSS on 3rd Ubuntu Machine
Step 1: Check out the GIT trunk version of OAI
Download the source codes using git:
mkdir -p ~/openair-cn
git clone https://gitlab.eurecom.fr/oai/openair-cn.git
Refer to Get the Sources for more details.
Step 2: Run Automated Build Script for EPC with S1 Interface
Build the EPC:
cd ~/openair-cn/SCRIPTS
./build_epc -c -l
This should starts the building process in ~/openair-cn/BUILD/EPC/BUILD.
You should see the built binary mme_gw located in find ~/openair-cn/BUILD/EPC/BUILD
and also the configuration file epc.conf.
Step 3: Run Automated Build Script for HSS with S1 Interface
Build the HSS:
cd ~/openair-cn/SCRIPTS
./build_hss -c -l
Note: oaiPlatform3 is the hostname for the Ubuntu Machine whereby the MME is installed.
This should starts the building process in ~/openair-cn/BUILD/HSS/BUILD. You
should see the built binary oai_hss located ~/openair-cn/BUILD/HSS/BUILD
and also the configuration file hss.conf.
1.4 Installing eNB/EPC/HSS on 2nd Ubuntu Machine (Single Host)
If you would like to have eNB/EPC/HSS all in one single host, please refer the 1[1].
2. Network Diagram of the OAI eNB and OAI EPC/HSS
The network diagram of connecting the OAI eNB and OAI EPC/HSS is as illustrated folllowing:

Picture taken from 1[1] with minor modification on EPC/HSS's Internet access. Thanks to Shaun Ying.
Please make sure that you have necessary switch and router to connect both 2nd and 3rd Ubuntu machines using eth1.
2.1 eNB Configuration to Access EPC/HSS
eNB network configuration related to eth1 network interface (192.168.100.102/24) used by the 2nd Ubuntu machine and MME's IP address is 192.168.100.103/24.
////////// MME parameters:
mme_ip_address      = ( { ipv4       = "192.168.100.103";
                          ipv6       = "192:168:30::17";
                          active     = "yes";
                          preference = "ipv4";
                        }
                      );

NETWORK_INTERFACES :
{
    ENB_INTERFACE_NAME_FOR_S1_MME            = "eth1";
    ENB_IPV4_ADDRESS_FOR_S1_MME              = "192.168.100.102/24";

    ENB_INTERFACE_NAME_FOR_S1U               = "eth1";
    ENB_IPV4_ADDRESS_FOR_S1U                 = "192.168.100.102/24";
    ENB_PORT_FOR_S1U                         = 2152; # Spec 2152
};
2.2 EPC/HSS Configuration to Access Internet and Connecting eNB
EPC/HSS network configuration related to eth1 network interface (192.168.100.103/24) used by the 3rd Ubuntu machine.
IP address pool used by EPC to assign to UE are 192.188.0.0/24 and 192.188.1.0/24 respectively with DNS set as "10.44.1.33" and "200.15.14.14".
MME :
{
    .......

    NETWORK_INTERFACES :
    {
        MME_INTERFACE_NAME_FOR_S1_MME         = "eth1";                         # YOUR NETWORK CONFIG HERE
        MME_IPV4_ADDRESS_FOR_S1_MME           = "192.168.100.103//24";           # YOUR NETWORK CONFIG HERE

        MME_INTERFACE_NAME_FOR_S11_MME        = "none";
        MME_IPV4_ADDRESS_FOR_S11_MME          = "0.0.0.0/24";
    };
};

S-GW :
{
    NETWORK_INTERFACES :
    {
        SGW_INTERFACE_NAME_FOR_S11              = "none";
        SGW_IPV4_ADDRESS_FOR_S11                = "0.0.0.0/24";

        SGW_INTERFACE_NAME_FOR_S1U_S12_S4_UP    = "eth1";                       # YOUR NETWORK CONFIG HERE
        SGW_IPV4_ADDRESS_FOR_S1U_S12_S4_UP      = "192.168.100.103/24";          # YOUR NETWORK CONFIG HERE
        SGW_IPV4_PORT_FOR_S1U_S12_S4_UP         = 2152;                         # PREFER NOT CHANGE

        SGW_INTERFACE_NAME_FOR_S5_S8_UP         = "none";                       # DO NOT CHANGE
        SGW_IPV4_ADDRESS_FOR_S5_S8_UP           = "0.0.0.0/24";                 # DO NOT CHANGE
    };
};

P-GW =
{
    NETWORK_INTERFACES :
    {
        PGW_INTERFACE_NAME_FOR_S5_S8          = "none";                         # DO NOT CHANGE
        PGW_IPV4_ADDRESS_FOR_S5_S8            = "0.0.0.0/24";                   # DO NOT CHANGE

        PGW_INTERFACE_NAME_FOR_SGI            = "eth0";                         # YOUR NETWORK CONFIG HERE
        PGW_IPV4_ADDRESS_FOR_SGI              = "10.44.35.68/24";            # YOUR NETWORK CONFIG HERE
        PGW_MASQUERADE_SGI                    = "yes";                          # YOUR NETWORK CONFIG HERE
    };

    IP_ADDRESS_POOL :
    {
        IPV4_LIST = (
                      "192.188.0.0/24",                                         # YOUR NETWORK CONFIG HERE
                      "192.188.1.0/24"                                          # YOUR NETWORK CONFIG HERE
                    );
        IPV6_LIST = (
                      "2014:02:26::0/120"                                       # YOUR NETWORK CONFIG HERE
                    );
    };

    DEFAULT_DNS_IPV4_ADDRESS     = "10.44.1.33";                              # YOUR NETWORK CONFIG HERE
    DEFAULT_DNS_SEC_IPV4_ADDRESS = "200.15.14.14";                              # YOUR NETWORK CONFIG HERE
};
3. MCC, MNC and TAC between EPC/HSS and eNB
Please make sure that the MCC, MNC and TAC are tailored, so that eNB can talk to EPC/HSS and vice versa.
eNB configuration file:
// Tracking area code, 0x0000 and 0xfffe are reserved values
tracking_area_code  =  "10001";

mobile_country_code =  "502";

mobile_network_code =  "11";
EPC configuration file:
MME :
{
    ....
    GUMMEI :
    {
        ....
        TAI_LIST = (
             {MCC="502" ; MNC="11";  TAC = "10001"; }                               # YOUR PLMN CONFIG HERE
        );
    };

    ....
};
4. Running OAI UE, OAI eNB and OAI EPC/HSS with S1 interface
The setup should be started with running the OAI EPC/HSS first before running the OAI eNB. The, only run the OAI UE. Both OAI eNB and OAI UE are running on LTE FDD Band 7 (DL: 2660MHz, UL: 2540MHz).
4.1 Run EPC/HSS on 3rd Ubuntu Machine
Step 1: Running the EPC
Use the following commands to run the EPC.
cd ~/openair-cn/SCRIPTS
./run_epc 2>&1 | tee epc.log
This will trigger the program mme_gw.
The configuration file for epc.conf located at ~/openair-cn/BUILD/EPC/BUILD
and mme_fd.conf located at /usr/etc/freeDiameter. Both can be found here:
epc.conf and
mme_fd.conf.
Step 2: Running the HSS
Use the following commands to run the HSS.
cd ~/openair-cn/SCRIPTS
./run_hss 2>&1 | tee hss.log
This will trigger the program oai_hss.
The configuration file for hss.conf located at ~/openair-cn/BUILD/HSS/BUILD
and hss_fd.conf located at /usr/etc/freeDiameter. Both can be found here:
hss.conf
and hss_fd.conf.
Once both EPC and HSS are able to communicate between each other, the EPC state is moved from STATE_CLOSED to STATE_OPEN and the following log is observerd:
[S6A] [D]Peer oaiPlatform3.openair4G.eur is now connected...
4.2 Run eNB on 2nd Ubuntu Machine
The eNB is preferable to run only after both EPC and HSS have connected and properly functional. Run the command as follow:
cd ~/openairinterface5g/
sudo -E ./targets/bin/lte-softmodem.Rel10 -O $OPENAIR_TARGETS/PROJECTS/GENERIC-LTE-EPC/CONF/enb.band7.tm1.usrpb210.conf 2>&1 | tee FDD-enb.log
If your eNB is successfully connected to MME (EPC/HSS), you should observe:
[ENB_APP][I][eNB_app_task] [eNB 0] Received S1AP _REGISTER_ENB_CNF: associated MME 1
The eNB log (no UE attached) can be found at FDD-enb-connect-mme.log.
4.3 Run UE on 1st Ubuntu Machine
The command of running the UE should be as follow:
cd ~/openairinterface5g/
sudo ./targets/bin/init_nas_s1 UE
cd targets/bin
sudo -E ./lte-softmodem.Rel10 -U -C2660000000 -r25 --ue-scan-carrier --ue-txgain 70 --ue-rxgain 80 2>&1 | tee UE.log
By running UE with pipes tee UE.log, allow you to record the UE logging to be used for further investigation.
init_nas_s1 allows you to install the ue_ip.ko kernel module and bring up
the OIP interface, oip0. MME will assign IP address using IP address pool
to this interface. The script can be found here:
init_nas_s1.
Other patches required are listed in 3[3], 4[4], 5[5] and 6[6]. Please note that patch 7[7] is mainly for MCC and MNC for Telekom Malaysia FDD Band 7 and also required for EPC/HSS building process. Patch 8[8] is related to generate the UE information.
If you have the following errors:
[NAS][E][nas_user_initialize] /home/oai/svn-oai/openair4G/openair-cn/NAS/UE/nas_user.c:213 USR-MAIN - Failed to read ./.ue.nvram
Please make sure that you copy the .ue_emm.nvram, .ue.nvram and .usim.nvram to the directory that you execute lte-softmodem command.
4.4 Results of Successful UE attached to eNB
If the user is successfully attached to the eNB/EPC/HSS, you should observe the Attach Complete message sent by the UE and the UE state is RRC_RECONFIGURED. The example of the UE log file can be found at UE-FDD.log.
Your OAI UE's oip0 interface should be assigned with the IP address
given by the MME as follow while typing ip address show oip0:
inet 192.188.0.2/24 brd 192.188.0.255 scope global oip0
Note: Please assure that you are using oip0 instead of oip1 for this tutorial. Find the patch here 9[9].
The eNB will also indicate that the receiving of RRCConnectionReconfigurationComplete message from the UE and the UE state is moved to RRC_RECONFIGURED. The example of the eNB log file with OAI UE successfully attached can be found at FDD-enb.log.
Both EPC and HSS for successfully UE attachment can be found here: epc.log and hss.log.
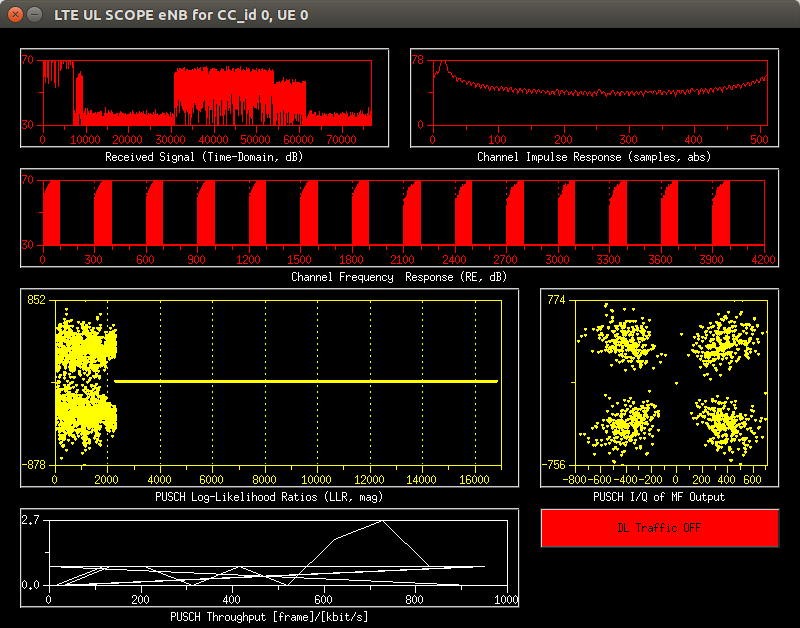
DL eNB Scope:
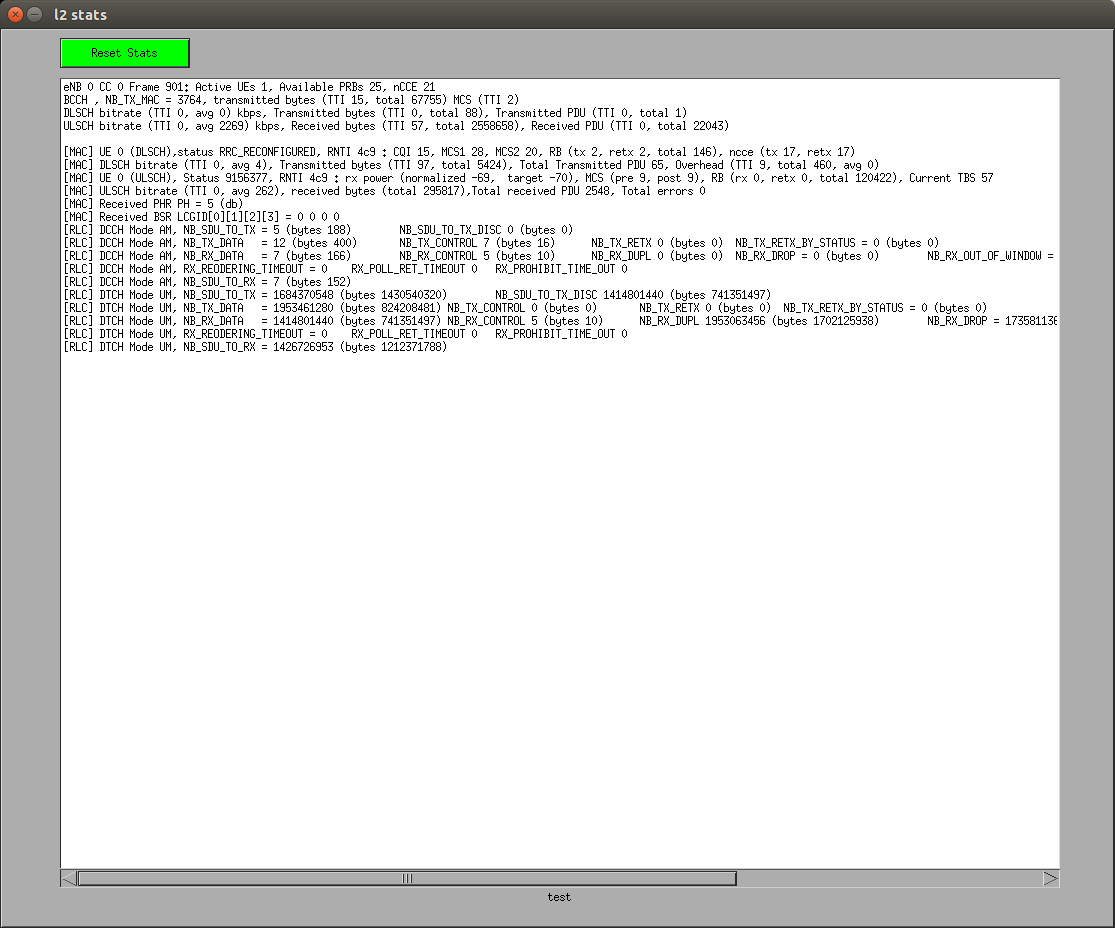
eNB stats:

eNB L2 stats:
5. Network Testing
Several round of running and terminating the UE and the eNB before the UE is successfully attached to the eNB, so be patient on that.
5.1 Check IP setting in OAI UE
Please make sure that you get the IP address for your oip0 interface from MME as follow:
sudo ip address show oip0
Add default route in case that you don't have any other network interfaces in OAI UE:
sudo ip route add default via 192.188.0.1
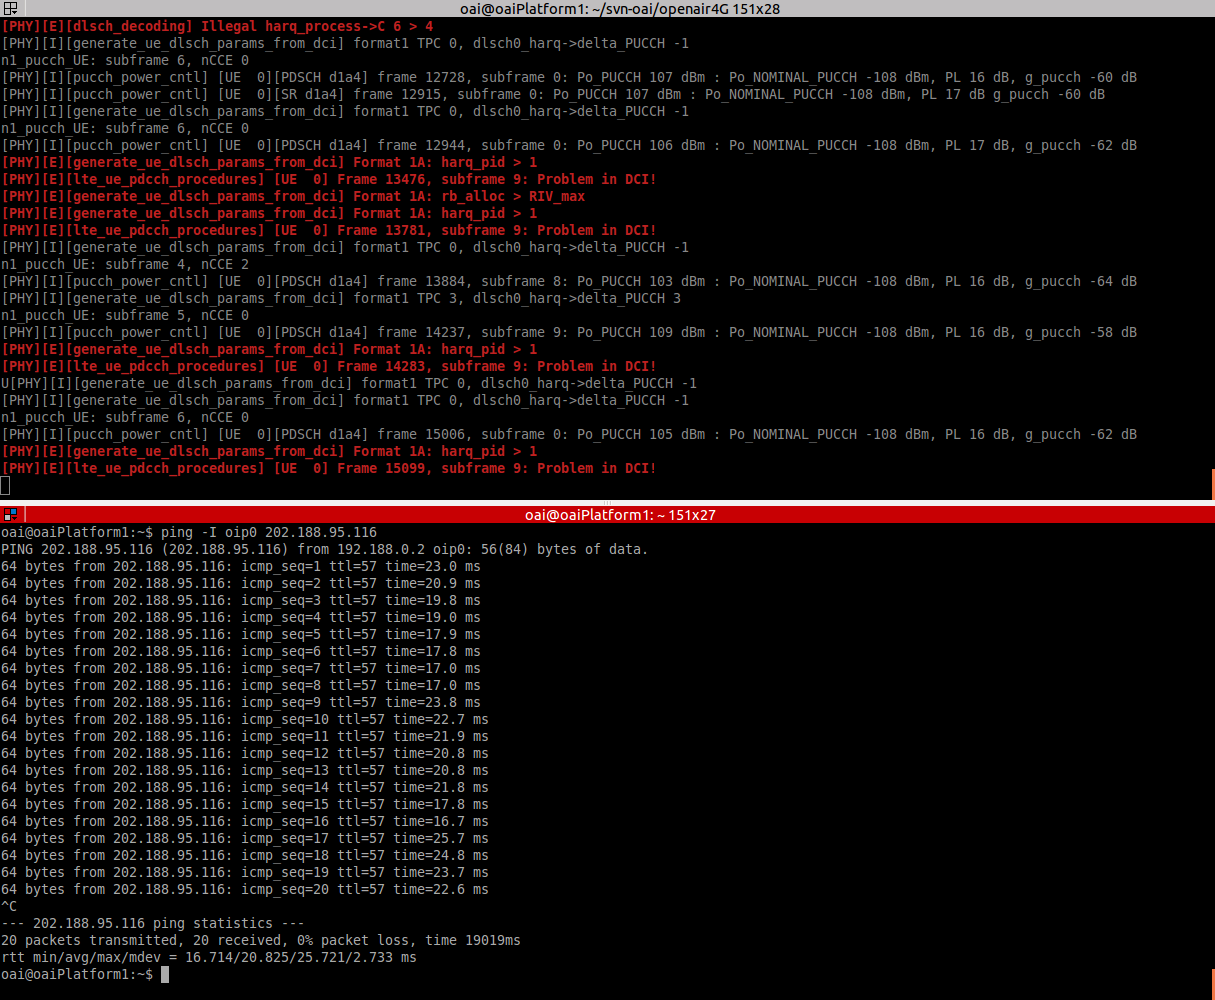
5.2 PING Test
Just do a PING to any public IP from your OAI UE, you should see the following:
Wireshark Tracing in OAI EPC/HSS: MME-ICMP-Data.pcapng
Wireshark Tracing in OAI eNB: eNB-ICMP-Data.pcapng
EPC, HSS, eNB and UE logging information during network test can be found here:
Bugs
TBA
Acknowledgement
Please refer to 9[9] in case of problem on EPC/HSS site.
This work was supported by Telekom Research & Development Sdn. Bhd.
References:
- [1] HowToConnectCOTSUEwithOAIeNB [1]: HowToConnectCOTSUEwithOAIeNB
- [2]
a807b5939a[2]:a807b5939a - [3]
2a203e1050[3]:2a203e1050 - [4]
886d146bbf[4]:886d146bbf - [5]
7be01927d3[5]:7be01927d3 - [6]
f534985b8d[6]:f534985b8d - [7]
886d146bbf[7]:886d146bbf - [8]
2f0b739930[8]:2f0b739930 - [9]
b1b57a0abd[9]:b1b57a0abd
Attachments
- eNB_EPC_separate_host-edit.png
- eNB-ICMP-Data.pcapng
- eNB-S1-L2stats.png
- eNB-S1.png
- eNB-S1-stats.png
- epc.conf
- epc.log
- epc-NT.log
- FDD-enb-connect-mme.log
- FDD-enb.log
- FDD-enb-NT.log
- hss.conf
- hss_fd.conf
- hss.log
- hss-NT.log
- init_nas_s1
- mme_fd.conf
- MME-ICMP-Data.pcapng
- Ping-OAI-UE.png
- UE-FDD.log
- UE-FDD-NT.log
-- @chunyeow - 12 Aug 2015